Description
Yes, you can connect two solar panels to one charge controller, provided the combined voltage and current match the controller's specifications.

Understanding Solar Panel and Charge Controller Compatibility
Understanding the compatibility between solar panels and charge controllers is crucial for setting up an efficient and safe solar power system. This section delves into the fundamental principles of connecting solar panels to charge controllers and explains their interdependent roles in harnessing solar energy.
Basics of Solar Panel Connections
Solar panels generate electricity by converting sunlight into electrical energy. The connection of solar panels to a system is a critical step that determines the overall power output and efficiency. When connecting multiple panels, two common methods are used: series and parallel connections. In a series connection, the voltage of each panel adds up, while the current remains constant. This setup is often used when dealing with charge controllers that can handle higher voltage inputs. On the other hand, parallel connections keep the voltage constant and add up the currents from each panel, suitable for systems that require higher current inputs.
Key parameters like the voltage, current, and power output of the solar panels must match or fall within the specifications of the charge controller. For instance, a solar panel with a maximum power output of 250 watts at 24 volts would require a charge controller that can handle at least 24 volts and 10.42 amperes (assuming 250 watts/24 volts = 10.42 amperes).
Role and Function of Charge Controllers in Solar Systems
Charge controllers, also known as solar regulators, are essential components that regulate the voltage and current coming from the solar panels to the batteries. Their primary function is to prevent the batteries from overcharging, which can reduce battery life and effectiveness. Modern charge controllers offer additional functionalities like Maximum Power Point Tracking (MPPT) and Pulse Width Modulation (PWM), enhancing the efficiency of solar energy conversion.
For example, an MPPT charge controller adjusts its input to capture the maximum power from the solar panels. This is particularly useful in varying weather conditions, where the solar panel output might fluctuate. A high-quality MPPT controller can significantly improve the efficiency of a solar power system, often by 20-30% compared to PWM controllers.
The choice of a charge controller also depends on the system's overall power requirement and budget. A solar power system designed to produce 1 kilowatt-hour per day at a location with average sunlight might need a different charge controller compared to a system aimed at producing 5 kilowatt-hours in the same conditions. Additionally, the cost of MPPT controllers is generally higher than PWM controllers, but the increased efficiency can offset the initial investment over time.

Technical Guidelines for Connecting Multiple Solar Panels
When setting up a solar panel array, understanding the differences between series and parallel connections is vital. These connections impact the overall performance, efficiency, and suitability of the solar power system for specific applications.
Series vs Parallel Connections: Pros and Cons
| Feature |
Series Connection |
Parallel Connection |
| Voltage |
Adds up the voltage of each panel |
Keeps voltage constant |
| Current |
Current remains constant |
Adds up the current of each panel |
| Efficiency |
Higher efficiency in low-light conditions |
Less impact from partial shading |
| Cost |
Generally, less expensive due to fewer components |
May require thicker cables, increasing cost |
| Compatibility with Charge Controllers |
Suitable for charge controllers with higher voltage input |
Suitable for higher current systems |
| Ease of Installation |
Simpler, with fewer connections |
More complex due to more connections |
| System Expansion |
Limited by charge controller voltage |
Easier to add more panels |
Calculating Voltage and Current for Safe Connections
To ensure safe and efficient connections when setting up a solar power system, calculating the voltage and current is essential.
For instance, in a series connection of four 12-volt, 5-ampere solar panels, the total voltage would be 48 volts (12V x 4), and the current would remain at 5 amperes. In contrast, the same panels connected in parallel would result in a total current of 20 amperes (5A x 4), with the voltage staying constant at 12 volts.
It's crucial to match these values with the specifications of the charge controller and batteries. Using a charge controller that cannot handle the combined voltage or current can lead to inefficiencies or damage to the system components. For a system with 48 volts and 20 amperes, a charge controller rated for at least these values is necessary, considering a safety margin.
In addition to these calculations, factors like the cable size (to handle the current without significant losses), the type of connectors, and the overall layout of
the panels should be considered. Larger cable sizes may be required for parallel connections to handle the increased current, which can add to the cost and complexity of installation.
Optimizing System Performance
To maximize the efficiency and lifespan of a solar power system, careful planning and consideration of the specific site conditions are required. Factors like geographical location, average sunlight hours, and potential shading issues should be taken into account.

Selecting the Right Charge Controller for Multiple Panels
Selecting the appropriate charge controller is a critical step in designing an efficient and reliable solar power system, especially when dealing with multiple solar panels. The type of charge controller and its specifications must align with the solar panels' output for optimal performance.
Types of Charge Controllers and Their Suitability
There are two main types of charge controllers: Maximum Power Point Tracking (MPPT) and Pulse Width Modulation (PWM).
- MPPT Charge Controllers:
- Suitability: Best for systems where the panel voltage is higher than the battery voltage.
- Efficiency: Can be up to 30% more efficient than PWM controllers.
- Cost: Generally more expensive due to advanced technology.
- Ideal Use: Large systems with significant power requirements or varying environmental conditions.
- PWM Charge Controllers:
- Suitability: Ideal for smaller systems where the panel voltage is close to the battery voltage.
- Efficiency: Less efficient than MPPT but sufficient for small to medium-sized systems.
- Cost: More cost-effective, suitable for limited budgets.
- Ideal Use: Small home systems, DIY projects, and systems with a tight budget.
Matching Charge Controller Specifications with Panel Outputs
To ensure the compatibility of the charge controller with the solar panels, several key specifications need to be considered:
- Voltage Compatibility:
- The charge controller must handle the voltage output of the solar panels.
- For example, a 24V solar panel system requires a charge controller that supports at least 24V.
- Current Capacity:
- The charge controller should be able to handle the total current output of the solar panels.
- If the total current of the solar panels is 20 amperes, the charge controller should support more than 20 amperes.
- Maximum Input Power:
- The controller's maximum input power must exceed the total power output of the solar panels.
- A system producing 1000 watts will need a charge controller that can handle at least 1000 watts.
- Additional Features:
- Features like temperature compensation, LCD displays, and network capabilities can enhance system management and monitoring.

Installation and Setup Procedures
Proper installation and setup are crucial for the optimal performance and longevity of a solar panel system. This section provides a detailed guide on how to connect solar panels to a charge controller and addresses common troubleshooting issues.
Step-by-Step Guide to Connecting Panels to a Controller
- Safety First:
- Ensure all components are turned off before starting.
- Wear appropriate safety gear like gloves and safety glasses.
- Mounting the Solar Panels:
- Securely mount the solar panels in a location with maximum sun exposure.
- Orient the panels according to your geographical location for optimal sunlight absorption.
- Wiring the Solar Panels:
- Determine if the panels will be connected in series or parallel based on your system’s requirements.
- Use proper gauge wires to connect the solar panels to each other.
- Ensure all connections are tight and secure.
- Connecting Panels to the Charge Controller:
- Identify the positive and negative terminals on both the solar panels and the charge controller.
- Connect the positive wire from the solar panels to the positive terminal of the charge controller, and the same with the negative wires.
- Use appropriate connectors and ensure the connections are weatherproof if outside.
- Connecting the Charge Controller to the Battery:
- First, connect the charge controller to the battery before connecting to the solar panels.
- This order ensures the charge controller recognizes the voltage of the battery system correctly.
- Finalizing the Setup:
- Once all connections are made, turn on the system.
- Verify that the charge controller is showing the correct charging status and the panels are working efficiently.
Troubleshooting Common Connection Issues
- Solar Panels Not Charging the Battery:
- Check all connections for looseness or corrosion.
- Ensure the solar panels receive adequate sunlight.
- Verify the voltage output of the solar panels matches the input requirements of the charge controller.
- Charge Controller Not Recognizing Solar Panels:
- Inspect the connections between the solar panels and the charge controller.
- Measure the voltage output from the solar panels to ensure it falls within the charge controller's acceptable range.
- Inconsistent Power Output:
- Check for shading or obstructions that might affect the solar panels’ performance.
- Test individual panels and connections to isolate any underperforming elements.
- Overheating of Components:
- Ensure all components have proper ventilation.
- Check if the system's current and voltage are within the specifications to prevent overload.
Performance Optimization and Maintenance
Optimizing the performance and maintaining the efficiency of multi-panel solar setups is crucial for maximizing the return on investment and ensuring the longevity of the system.
Maximizing Efficiency in Multi-Panel Setups
To achieve the highest efficiency in a multi-panel solar system, consider the following:
- Optimal Panel Placement:
- Place panels in a location with maximum sun exposure, avoiding shading from trees or buildings.
- Orient panels correctly according to latitude and seasonal sun positions.
- Using MPPT Charge Controllers:
- MPPT controllers can improve efficiency by up to 30% compared to PWM controllers.
- They adjust the input from the solar panels to extract the maximum power available.
- Balancing Panel Arrays:
- Ensure all panels in an array have similar exposure and are not partially shaded.
- Mismatched panel exposure can lead to overall reduced system efficiency.
- Regular Cleaning and Inspection:
- Clean panels regularly to remove dust, leaves, or snow that can block sunlight.
- A dirty panel can lose up to 25% efficiency.
- System Upgrade and Expansion:
- Consider upgrading older panels or adding additional panels to increase total system output.
- Ensure new panels are compatible with existing system components.
Regular Maintenance and Performance Monitoring
Maintaining and monitoring your solar system is key to sustaining its performance over time.
- Routine Inspections:
- Inspect the system regularly for physical damage, loose connections, or exposed wires.
- Check for corrosion, especially in coastal areas with salty air.
- Performance Tracking:
- Monitor the system’s output using a performance meter or software.
- Regular monitoring can help identify drops in efficiency due to equipment issues.
- Battery Maintenance:
- For systems with batteries, ensure they are kept at recommended charge levels.
- Replace batteries if they no longer hold a full charge or show reduced efficiency.
- Professional Servicing:
- Have the system professionally inspected every few years, especially for large or complex setups.
- Professional servicing can identify issues that may not be obvious to the untrained eye.
Case Studies and Real-World Examples
Exploring real-world examples and case studies of multi-panel solar setups connected to a single charge controller provides valuable insights into their practical application, efficiency, and challenges faced.
Successful Implementations of Multi-Panel to Single Controller Setups
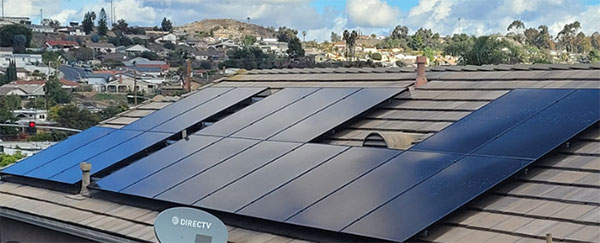
- Residential Rooftop Installation:
- Location: California, USA
- Setup: 20 panels, each 300 watts, connected in series to an MPPT charge controller.
- Total Power: 6 kW
- Outcome: The system generates approximately 30 kWh per day, covering most of the household's energy needs, with a significant reduction in electricity bills.
- Remote Industrial Facility:
- Location: Queensland, Australia
- Setup: 50 panels, each 250 watts, connected in parallel to a high-capacity MPPT controller.
- Total Power: 12.5 kW
- Outcome: The system provides consistent power for critical industrial operations, even in variable weather conditions, demonstrating the robustness of MPPT controllers in diverse environments.
Lessons Learned and Best Practices
- Importance of Proper Sizing:
- Ensuring the charge controller can handle the total voltage and current is crucial. Underestimating can lead to system failure or inefficiencies.
- Benefits of Regular Maintenance:
- Regular cleaning and inspection can prevent efficiency losses. For example, a study found that regular cleaning can improve efficiency by up to 25%.
- Adaptation to Environmental Conditions:
- In areas with frequent shading or cloud cover, using an MPPT controller can significantly improve efficiency compared to PWM controllers.
- Cost vs. Performance:
- While MPPT controllers are more expensive, the increased efficiency often justifies the higher cost, especially in larger setups.
- Professional Installation and Monitoring:
- Professional installation ensures safety and compliance with local regulations. Continuous monitoring helps in early detection of issues.